
Gelli Plate Gift Wrap: DIY Wrapping Paper Tutorial (With Photos + Videos)
Tired of perusing the Target aisles for the same boring gift wrap? Let me show you how to create absolutely gorgeous custom wrapping paper using a gelli plate! And trust me, it's way easier than it looks. 🤓
I've been making gelli plate gift wrap for years now, and it's become my secret weapon for making presents look extra special without spending a fortune. Plus, there's something so satisfying about wrapping a gift in paper you made yourself. Whether you're prepping for the holidays or just want to elevate your gift-giving game, this gelli plate printing technique is perfect for beginners.
What Is Gelli Plate Printing?
If you're new to gelli plates, here's the quick rundown: a gelli plate is a reusable gel printing surface (it feels kind of like firm Jello) that lets you create monoprints — which is just a fancy way of saying one-of-a-kind prints. You apply acrylic paint, add texture with everyday items like bubble wrap or stencils, then press paper onto it to transfer the design.
What makes gelli plate printing perfect for DIY gift wrap is that every sheet you create is completely unique. No two prints are exactly alike, which means your wrapping paper will be totally custom. Plus, you can make a ton of sheets in one session, so it's budget-friendly and time-efficient once you get going.
If you're completely new to gelli plate techniques, you might want to check out my beginner's guide first — but honestly, gift wrap is one of the easiest projects to start with because "imperfect" prints still look beautiful!
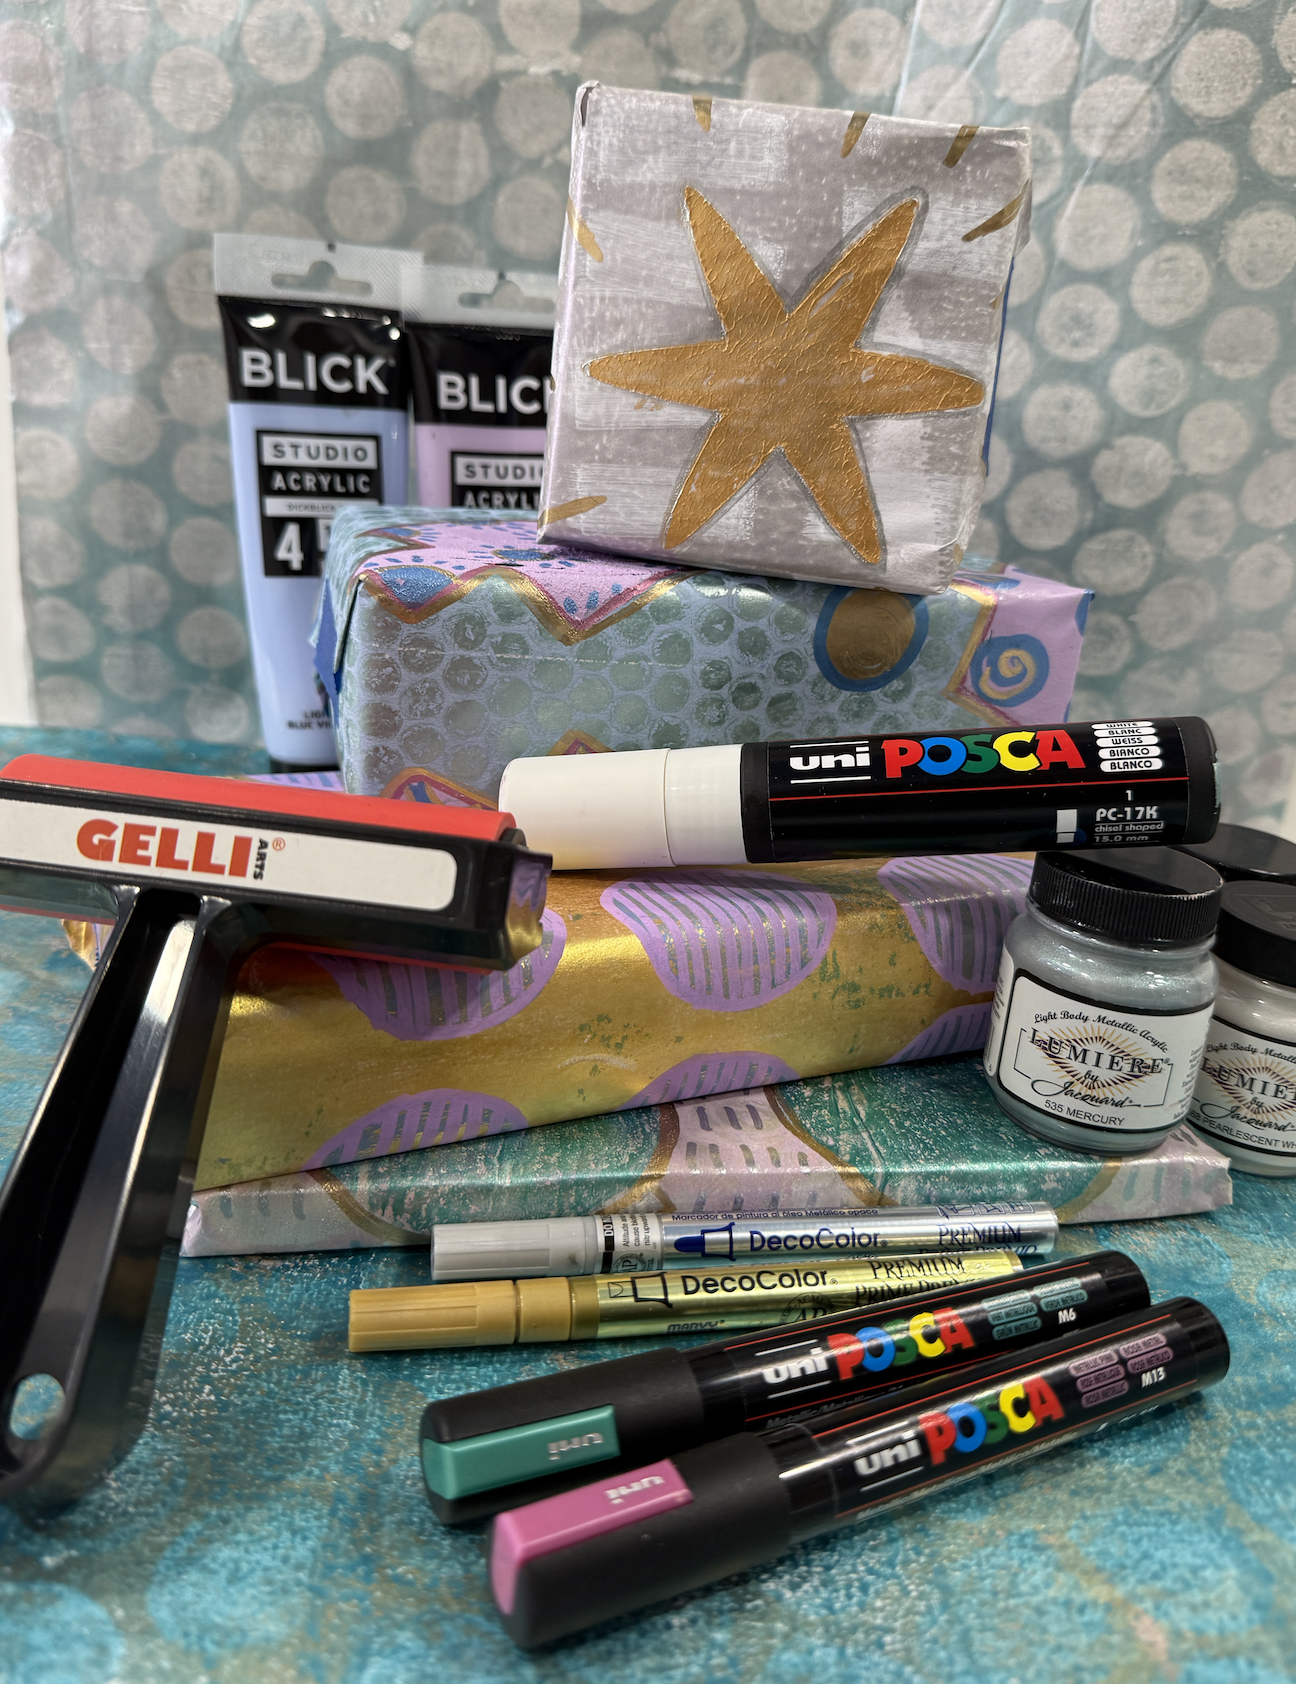
Supplies You Need for Gelli Plate Gift Wrap
Gelli Plate
8"x10" Gelli plate — Perfect for small boxes and gift bags. I prefer the Gelli Arts printing plate (the original brand).
Poster-size Gelli plate — Ideal if you're making actual wrapping paper for larger gifts.
Acrylic Paint
Heavy body paints — When working with the poster-sized gelli plate, use slower-drying paint. Quick-dry formulas will set before you can transfer them to paper.
Metallic paints — This is my favorite gold paint, but it comes in tons of colors for that luxe look.
Golden Fluid Acrylics — Great choice for the jumbo gelli plate; they stay workable longer.
Regular acrylic paints in a variety of colors
Other Essentials
Brayer — For rolling paint evenly
White easel paper — My go-to for clean, bright prints
Old book pages or newsprint — Perfect for vintage-vibe wrapping paper
Baby wipes or damp cloth — For quick cleanup between prints
Paper towels
Table covering — a flannel backed tablecloth is perfect, but anything that keeps your surface covered will work
Texture Tools (Pick 2–3 to Start)
Best Paper for Gelli Plate Gift Wrap
Not all paper works well for gelli plate printing, so here's what I recommend:
White easel paper is my absolute favorite for gift wrap. It's lightweight enough to wrap easily, absorbent enough to grab the paint, and the white background makes your colors pop beautifully. You can find large rolls at craft stores or grab a roll here.
Newsprint or old book pages create a gorgeous vintage aesthetic and are super eco-friendly if you're upcycling. The text showing through the paint adds an artsy, layered look that's perfect for book lovers or vintage-themed gifts.
Avoid glossy or coated paper — the paint won't adhere properly and you'll end up frustrated. Also skip cardstock for wrapping paper; it's too thick to fold nicely around gifts (though it's great for making matching gift tags!).
Step-by-Step: How to Make Gelli Plate Wrapping Paper
Step 1: Prep Your Gelli Plate and Paint
Start by squeezing 2-3 small dollops of acrylic paint onto your gelli plate. Think "jumbo chocolate chip" sized — you want enough to cover the surface but not so much that it's goopy.
Use your brayer to roll the paint into a thin, even layer across the gel plate surface. Too much paint takes forever to dry and can make your prints blurry.
Don't over-mix the colors - remember, slight color variation adds visual interest and keeps your design from looking flat.
Pro tip for beginners: I like to start by making several background papers using just one or two colors to create a nice, smooth base layer. This is an easy way to guarantee a unique design right from the start, and it builds your confidence before you try more complex techniques.
Step 2: Add Texture with Everyday Tools
This is where the magic happens! Press your chosen texture tool into the wet paint:
Bubble wrap = Playful, modern pattern with organic circles
Stencils = Clean, graphic repeat patterns
Corrugated cardboard = Bold linear texture (you can use recycled shipping boxes!)
Grocery store finds = Bunch up plastic grocery bags, or use fruits and veggies to create unexpected textures
Rubber stamps = Controlled motifs and repeated shapes
Spray bottle = Mist water or rubbing alcohol onto the paint for interesting splotchy effects
Paint directly = Use a brush or silicone tools to drag through the fresh paint (just avoid sharp tools that could damage your plate)
Pro tip for beginners: Be sure to lift the tool straight up so the design stays crisp and doesn't smear.
Step 3: Pull Your First Print
Quickly lay your paper onto the wet paint, you don't want the paint to dry before you transfer it.
Use your brayer or a baren to gently roll over the back of the paper, making sure it's making full contact with the paint. I like to feel the back of the paper to check if it feels wet or cold. If it's soaking wet or very cold, you might have used too much paint and should wait a second before pulling.
Carefully peel back one corner and pull the paper away to reveal your print. That first reveal is always so satisfying!
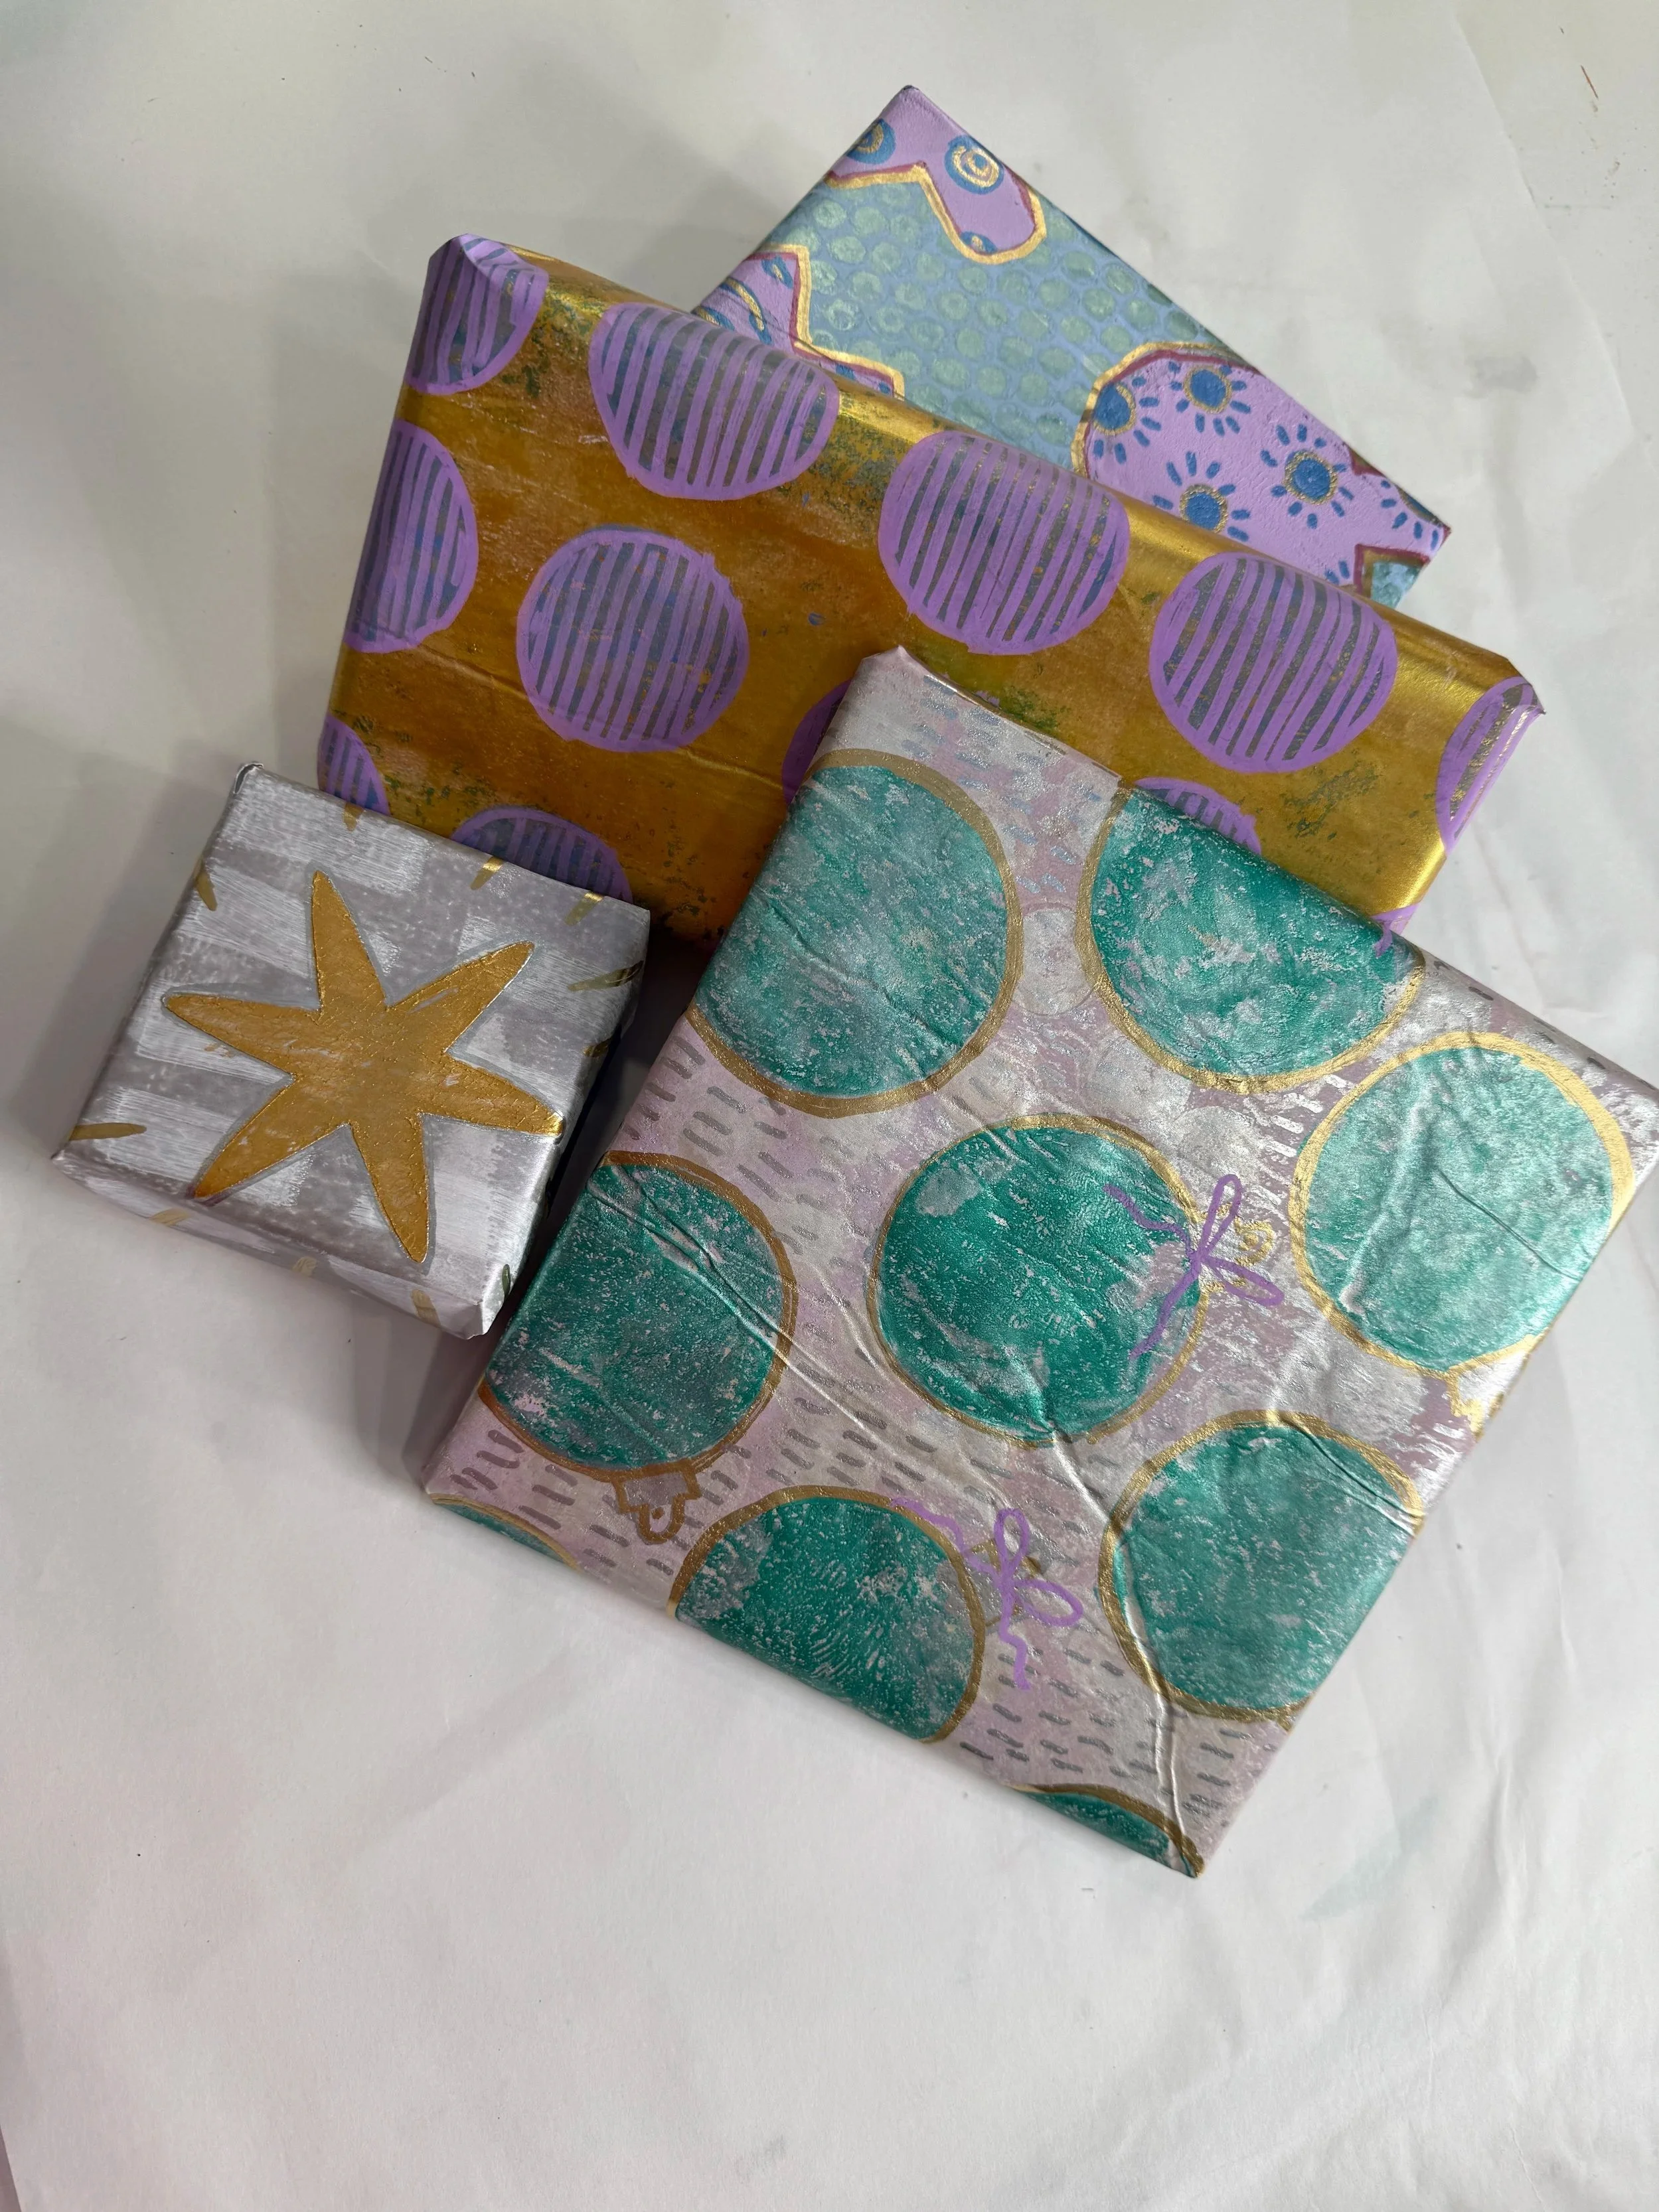
Step 4: Layer for Complex Designs
Here's where you can get creative:
Immediately after pulling your first print, place a fresh piece of paper onto the gelli plate to pick up any remaining paint. This "ghost print" often becomes one of the most interesting pieces — it's lighter and more subtle than the first pull. Don't worry if there are still visible areas of paint on your plate; honestly, I think this makes the next layer more interesting.
For a second layer of texture, add another thin layer of acrylic paint in a contrasting color, then use a different texture tool. For example, if you used a stencil for the first layer, try bubble wrap for the second. The key is using thin paint and opposing colors to create contrast.
Once your prints are dry, you can embellish them with Posca markers to add outlines, details, or hand-drawn elements. This is totally optional but adds a fun, handmade touch.

Troubleshooting Gelli Plate Gift Wrap (Common Problems)
Why is my paint drying too fast? You're probably using a quick-dry acrylic formula. Switch to slow-drying paints like Golden Fluid Acrylics, or add a drop of acrylic retarder medium to extend your working time. This is especially important with larger gelli plates.
Why is my print blurry or smudged? You used too much paint. Less is more with gelli plate printing — try for a thin, even layer that looks almost translucent on the plate.
Can I use cardstock or thick paper? Not for wrapping paper — cardstock is too thick to fold nicely around gifts. Stick to lightweight paper like easel paper, newsprint, or tissue paper weight.
My texture tool isn't creating clear patterns. What's wrong? Make sure you're pressing firmly and lifting straight up (not dragging). Also check that your paint layer is thin enough - thick paint fills in the textured areas and you lose definition.
How do I keep my gelli plate clean between colors? Baby wipes are your best friend! Wipe the plate clean between color changes. For stubborn paint, use a damp cloth with a tiny bit of dish soap.
Can I make gelli plate gift wrap ahead of time? Absolutely! Once dry, the prints are permanent. Store them flat or rolled loosely, and they'll keep for months.
Other Gelli Plate Projects to Try
Once you're hooked on gelli plate printing (and you will be), here are other projects to explore:
Junk journals — Use your prints as decorative pages and covers
Image transfer art — Layer prints to create mixed media artwork
Home decor — So many options - banners, art, & more!
Card making and stationery — Using your Gelli plate to make custom cards or stationary is so simple & fun!
Fabric printing — With fabric medium added to your paint, you can print on tote bags, tea towels, etc.
FAQs: Gelli Plate Wrapping Paper
How much does it cost to make gelli plate gift wrap? After your initial investment in a gelli plate ($20-40 depending on size), each sheet costs just pennies in paint and paper. It's significantly cheaper than premium wrapping paper from stores.
Is gelli plate gift wrap beginner-friendly? Absolutely! This is one of the easiest gelli plate projects to start with because there's no "wrong" way to do it. Every print looks unique and beautiful.
How long does gelli plate wrapping paper take to dry? Most prints dry within 15-30 minutes, depending on how thick your paint layer was. I usually make a big batch and let them dry overnight to be safe.
Can kids do gelli plate printing? Yes! This is a great project for older kids and teens. Just supervise the cleanup and make sure they're using non-toxic acrylic paints.
Ready to Make Your Own Custom Gift Wrap?
Gelli plate gift wrap is one of those projects that looks incredibly impressive but is actually super accessible for beginners. Once you make your first batch, you'll never want to buy generic wrapping paper again.
The best part? Every sheet is completely one-of-a-kind, which makes your gifts feel extra thoughtful and special. Plus, people always ask where you got your wrapping paper — and telling them you made it yourself is pretty satisfying. 🥳
Happy creating! 🎨